Put the lime in the coconut!

face cream 002

Strange title, I know. But I was humming this tune by Baha Men the entire time I was mixing my latest and greatest coconut oil concoction. It’s been almost two years since my last post, but I decided to take a time out and share my new discovery. Coconut oil. Yes, I know the internet is saturated with blogs about coconut oil, but I may have come up with a few unique ideas you haven’t heard of yet. Who knows!

Since I am really feeling (and looking) my age lately, I began scouring the web for something natural to put on my face to protect against further lines and wrinkles. The most common ingredients that kept popping up as a base were shea butter, cocoa butter, aloe, olive oil, and of course coconut oil.

FACEBOOK31

Needless to say, I chose coconut oil due to many reviewers saying it was a better choice for sensitive skin and frequent breakouts. (I still break out like a teenager if I’m not careful!)

Here is a recipe for my creation. I will explain why I chose each ingredient so that you can understand why I added it.

½ shot glass extra strong brewed Organic Green Tea with Ginseng. (Cooled)
½ shot glass extra strong brewed Organic Coffee. (Made with freshly ground beans and cooled.)
½ cup tightly packed Coconut Oil
1/4 cup Pure Aloe Vera Gel
3 Co-Q-10 gel caps (total of 300 mcg)
3 Vitamin E gel caps. (total of 600 IU)
2 Vitamin C liquid soft gels. (total of 1000 mg)

You could stop here, but I also added about a teaspoon of Loreal Revitalift for the Pro-Retinol A, and peptides.

I used an immersion blender which made my cream beautifully creamy and luxurious. I tried it on my elbows first; just in case I had some sort of reaction. I was amazed! My tough elbows were instantly smoothed and hydrated. No redness or irritation what-so-ever. So I moved on to my face and the sensitive, thinning skin under my eyes. Perfectomundo! My face felt awesome, and when I woke up the next day…even better! Needless to say, I am now using it all over my body, and have also begun using the plain coconut oil to condition my hair. It’s glorious, and I can’t believe I have not tried this sooner! Anther use I found, was that I could mix it with a bit of corn starch and baking soda, and it makes a great deodorant that really works.

Further more, because I my growing intolerance to floury, glutany products (and weight gain), last night I mixed old fashioned oats, diced dates, some coconut oil, walnuts, and some organic egg whites, and made a delicious granola bar type dessert.

Image result for medjool dates

So why did I choose the ingredients for my skin cream?

Green tea with Ginseng: Anti-inflammatory, gently caffeinated, chocked full of anti-oxidants. Ginseng activates skin renewal of cells and improves elasticity.
Coffee: The caffeine has an anti-inflammatory effect, reduces redness, wakes up tired eyes, and creates and even skin tone.
Coconut Oil: Antimicrobial, rich in essential fatty acids, proteins for rejuvenation and cell renewal, moisturizes without feeling greasy.
Aloe: Antibacterial, moisturizing, antioxidant rich, used for 1000’s of years for beautiful skin. (Tried and true!)
Co-Q-10: Neutralizes free radicals and has powerful antioxidant protection. As you age, the naturally occurring Co-Q-10 diminishes in the body.)
Vitamin E: Leaves a protective barrier on the skin, locking in moisture and keeping skin glowing and supple.)
Vitamin C: Produces collagen that will improve elasticity. Proven to be nearly as effective as retinol in the more expensive creams!

So there you have it. I encourage anyone that is looking for an inexpensive, natural,and effective alternative to those expensive, chemical-laden creams to give it a try! Cheers!

Our Growing Edible Landscape

009

This year we added a few more areas of edible plants to our small yard. The plants seem to be off to a great start, and my goal is to produce twice as much canned and freezable goods as last year. The strawberries that I planted along the South foundation wall have filled out nicely, and are producing tons of little white flowers that are quickly turning into green berries; which means delicious, red organic strawberries coming very soon! Strawberries are an awesome perennial that will produce year after year in good well drained soil. Ours have plenty of peat moss, vermiculite, and loose organic soil. This year I am letting the runners go crazy, but next spring it will be time to get them back under control by removing some plants and runners to ensure good berry size, and so they do not get root bound.

011

Our organic thornless blackberry is vining out, as I continue to train it up an old horse hitching post. (Now part of an anchor for our dog run.) We didn’t get any berries last year, but this year it is adorned with flowers, and I am anxiously awaiting making blackberry muffins and scones.

012

Our organic blueberry bush is still fairly small, but is beginning to produce as well. I gave it a nice dose of coffee grounds around the base of the plant around the time of our last frost, since it loves the acidity.

015

A three tier gutter planter is housing some various varieties of organic lettuce and baby spinach, and helps conceal an unsightly view of the driveway and grill looking from the East. The lettuce is already harvestable…and I just planted it eight weeks ago!

014

Our old, broken-wheeled yard cart has become a place for onions! They seems perfectly happy here and are growing wonderfully! It’s convenient having the onions and lettuce next to our deck for snipping before dinner.

016

The urban columnar apple trees survived a brutal attack by Japanese beetles last year, and they are starting to produce flowers as well. A great sign that we will have apples!

017

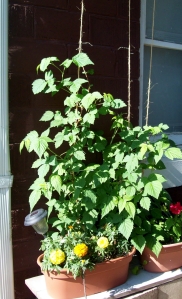
I have begun training the raspberries to grow up twine that I attached to a dowel rod just under our roof soffit by tiny hooks.  This is a great way to keep the plant from taking over a large portion of yard, and forcing them to grow upright.

019

Last year, this was our broccoli tower. This year I thought it was better suited for cherry tomatoes and jalapenos. Especially since our main garden area is filled to the brim with beefsteak, brandy-wine, and big girl tomatoes; along with green bell peppers, sweet corn, carrots, zucchini, cucumbers, watermelon, and cantaloupe. Beans and peas are coming soon! I’ve also planted brussel sprouts in large pots on the back deck as an experiment…I hope they produce well, as I think they a very cool looking plant, as well as a very delicious one! Thanks for sharing in our small edible landscape. Lots more to come!  

Doughnuts and Doggie Treats

001002

We are still recovering from the holidays around my house, along with dealing with some personal matters. I have missed blogging enormously, and hope to start some kind of routine again soon. I can’t wait for spring! I Just wanted to share a quick and easy double-duty recipe. Dough for doughnuts and doggie treats! They came out a bit on the ugly side, but everyone…including the family dog loved them!

Basic (Eggless) Recipe

1 ½ cups flour

2 teaspoons baking powder

¼ teaspoon salt

3/4 cup milk

¼ cup sugar

3 tablespoons melted butter

¼ teaspoon vanilla

Mix the dough well, until no longer sticky. Place in a greased bowl and cover with plastic wrap. Refrigerate at least an hour. Roll out dough on lightly floured surface to ¼ to ½ inch thick, and cut into shapes. Fry in oil that has reached a temp. of about 350. Flip as needed. Don’t forget to use the doughnut holes!

003

For doughnuts, we just used melted chocolate chips with a little shortening to make it creamy. The holes were tossed in a cinnamon/sugar mix while still hot.

For doggie treats, using the same dough, roll out just as you would the doughnuts. Cut into desired bone shapes. Bake on parchment paper on low temp. (About 275-300 degrees) for 1-2 hours until fairly crisp. It may take longer depending on how thick you roll the dough. Baste with chicken or beef broth every 15-20 minutes.

004

These are not the healthiest treats for doggies or humans…but once in awhile it’s worth the splurge. 

Hope everyone is doing well!

Mishaps & Mistletoe

gooey fudge

With only a couple of days to spare, I am finally feeling somewhat caught up! 

I hope some of my little mishaps can help you to avoid them.

Fudge

I tried a new recipe using miniature marshmallows (I usually make the old fashioned), and it did NOT set up properly! This was probably due to not using a candy thermometer and heating to the proper temperature for the proper time.

Here is what you can do with gooey fudge:

1. Use as fudge topping for ice cream.

2. Mix in more powdered sugar for cake frosting

3. Drizzle on cheesecake or pastries

4. Try reheating for fifteen minutes.

5. If it is thick enough, coat hands in vegetable oil, and roll into small balls. Coat in chocolate for homemade bon-bons. (This is what I did.)

100_3777

Hot cocoa gifts in a jar

These turned out pretty well, however, for better dissolving quality, run a few cups at a time in your food processor.

6 ½ cups powdered milk

1 cup chocolate drink mix

½ cup unsweetened cocoa powder

½ cup powdered sugar

1/3 powdered coffee creamer (Pick desired flavor.)

Makes 2 quart jars.

I used cleaned iced tea containers, mayo jars, and older wide-mouthed canning jars. To prepare hot chocolate, fill cup 1/3 with cocoa mix and add boiling water.

100_3781

Brownies

Lots of great recipes online, but for extra moist and chewy brownies, add ¼ cup real mayo. It sounds strange, but it works…for cakes as well! You cannot taste the mayonnaise.

100_3780

Original toll-house chocolate chip cookies

Substitute ½ the butter that is called for in the recipe with vegetable shortening. This will make your cookies chewy, bendable, and super delicious!

Old fashioned Oatmeal Raison

Take cookies out of the over 3-5 minutes earlier than recipe calls for. Allow to cool completely. I think they are better this way, because it makes them very soft and super yummy.

100_3785

Rice crispy treats

Make wreaths, Christmas trees, stockings, boxed gifts, etc. out of the treats. I did wreaths using green food coloring and mini m & m’s.

100_3779

Vanilla almond cupcakes

I used the recipe for firm cake on Wilton’s site. They are super good, and very firm for decorating. I made the marshmallow fondant from that site as well. It’s pretty easy to work with, and tastes better than gum paste fondant.

100_3784

Mint cookies

Just use original toll-house recipe (Substituting ½ shortening for butter), and add mint chips.

Other tips & discoveries

Poinsettias:

Contrary to popular belief, they are not really poisonous. They may cause stomach irritation if your pet ingests them, but usually that is about it. Humans may develop an itchy rash if they are sensitive to milk weed. To care for them, keep in a warm, humid, area with no drafts! Remember they are a tropical plant!

Mistle toe:

According to ancient Christmas custom, a man and a woman who meet under a hanging of mistletoe were obliged to kiss. The custom may be of Scandinavian origin. It was described in 1820 by American author Washington Irving in his “The sketch book of Geoffrey Crayon.”

Columbia pull-over’s:

These fleece winter shirts are becoming an obsession in my family. Unfortunately they run about $45 a piece! I found a few at local upscale thrift stores for a fraction of that. I simply boxed them with a few new items like matching socks, nail polish, or scarves.

Microsoft paint:

I have only recently began exploring the photo-shop capabilities, and other useful applications of this program. (I used to think it was just something for the kids to fool around on.) I have made e-book covers, cd covers, dvd cases, recipe booklets, and more using paint lately! Lots of tutorials available on the net.

Christmas lights:

We did our run-down country porch for only $10. That included the lights, wreath, and poinsettias. More thrift store finds, and homemade items!

100_3795

Power outage preparedness:

We were without power all evening on Thursday night due to the winter storm. I was able to cook dinner on our wood stove using my cast iron cookware. My family ate a skillet-supper of potatoes, eggs, ham, and cheese. Candles adorned the table and it was actually sort of nice! Also, LED lights are a lot brighter than typical flashlights, and last much, much longer. Also, keep hand sanitizer on hand, and a five gallon bucket of water for flushing the toilet!

100_3786

Wishing you all a very safe and very Merry Christmas!

Falling behind in Fall


Selmi’s Farm


Sorry I have been away from the blogging scene for so long! October, November, and December are always so busy around my house. I will be catching up tonight on all the blogs I have missed over the last couple of months. I hope everyone had a nice Halloween and Veteran’s Day and is looking forward to a wonderful  Thanksgiving and Christmas! I just wanted to check in and share a few pictures. The one above is at a local farm near us…cute, huh?

Support your favorite team! GO BEARS!

Enjoy a fall hay ride!

We found a nest of critters under the canopy of the tomato jungle, which is okay with me…just stay out of my house please!

This is what remains of the tomato garden. Such a shame that so many will be left on the ground. I have run out of canning jars, and the freezers are full. We have given away all that we can as well!

The roses LOVE the cooler temperatures. This one came back beautiful even after being attacked all summer by Japanese Beetles!

Gotta love the mums!

Last batch of Zukes from the garden. I set a can of soda by them so you could see how giant they became!

Made from green tomatoes, multiple kinds of peppers, fresh garlic, splash of vinegar, and a pinch of sugar. Yummy!

If you are giving a gift card or cash for a birthday, and you still would like to present them with a little something…then why not a candy bouquet? I made this one for less than $5.00 to give my daughter with her new cell phone.


Pre-made ice cream cakes from Dairy Queen are way over priced! I made this one relatively cheap, and the kids LOVED it! Mix chocolate chip cookies and a tablespoon of margarine in food processor. Press into bottom of spring-form pan to make the crust. Spread a thick layer of softened cookie dough ice cream on top. Next spread a layer of whipped topping, and drizzle with carmel and fudge. Top with crushed chocolate chip cookies. (NOT HEALTHY!!!)

We had two pumpkins decorating our front porch that were not carved into jack-o-lanterns, so i made pumpkin puree for pies. Just cut the pumpkin in half and scoop out seeds and guts. Place face down on a foil covered cookie sheet. (Lightly grease the foil first.) This large pumpkin took about an hour and a half at 325 degrees. Remove from oven and scoop out pumpkin from the skin while it is still hot. Puree in blender or food processor.

This will probably make about 5-6 pies. Use 2 cups puree with two eggs, 1 can evaporated milk, and sugars and spices to your liking. These turn out every time! It seems baking the pumpkin instead of boiling chopped pieces in water gives the pie a naturally sweeter taste. I like to drain the puree in a cheesecloth covered colander to get rid of some of the liquid, but if I don’t have time, i’ll just mix a tablespoon or two of flour in the pie before baking. This stuff freezes great too! For an extra luscious and creamy pie, run the pie batter through the processor a 2nd time, after you mix all of the ingredients together.  

Have a splendid day!

I look forward to reading what everyone has been up too…


Easy seeds to save

ingallshomestead.com


In our area, now is the time of year to start gathering seed for next year. Some plants are easier than others to gather seed and grow true-to-the-parent-plants. It is not recommended to grow from hybrid varieties of plants because of the low success rates. However, I once saved hybrid petunia seed and although the color was not the same as the parent plant, it was still strikingly unusual and pretty. Allow flowers to die and snip off of the plant. Carefully open dried flowers to reveal seed. Place in a sealed jar with a paper towel, or in a zip-lock bag and label.

wanowandthen.com

Here are some easy ones to try that have always been successful for me.

Annuals: Petunia, zinnia, marigold, sunflowers, and impatiens.

rastaseed.com

Perennials: Yarrow, hollyhock, asters, and coreopsis. 

care2.com

Vegetables: Beans, peppers, onion, zucchini, and lettuce.

vimeo.com

Fruit: Tomato, cantaloupe, watermelon, and honey dew.

shutterstock.com

I’m going to try and save sweet alyssum this year also. How about you? 

As American as apple pie

We were blessed with a colossal bounty of apples from a dear neighbor this year. Two five gallon buckets and a generous “There’s plenty more where those came from.”

Since I am running low on canning jars and really don’t want to purchase more this year, I decided on freezing a large batch of ready-to-go apple pie filling and canning just a couple of jars of apple sauce.

My husband and daughter helped me prepare the apples. Peel, core, and cut into large chunks. We filled a five quart saucepan to the brim and set on medium heat. I added just one cup of water because we like a thick (stay-on the spoon) texture to our apple sauce. We cooked for about 30 minutes until the apples were soft. I didn’t add any sugar because the apples are naturally sweet and delicious the way they are!

I used an immersion blender on high speed to blend the soft apples into a thick and tasty sauce.  I processed the jars in a hot water canner for 35 minutes and they sealed perfectly.

Next we made crock-pot apple pie filling. It couldn’t be simpler. Just fill your slow-cooker to the brim with apples. Sprinkle cinnamon and  dark brown sugar on top. I also used a very light pinch of Chinese five spice. It has cloves, nutmeg, cinnamon, fennel, and ginger in it.  (I know it sounds strange, but it really adds a great taste to pies!)

I let them cook on a low setting overnight. They were tender and not mushy in the morning. Next I let them cool to room temperature. Normally I would stop here and fill my freezer bags, but I decided to make a creamy apple filling for a change.

I made some rue out of real butter and flour. Then I added about 2 cups of milk with a tablespoon of cornstarch dissolved in it. I added more cinnamon and brown sugar and cooked over medium heat for about 15 minutes. It made a nice creamy filling. Next I just poured over my crock pot apples and stirred to coat them very well. Then I filled a gallon sized zip-lock bag and popped it in the freezer.

1 five gallon bucket of apples will yield four large apple pies, and two quarts of apple sauce.

For the next bucket, I am thinking of other items that we can freeze for sweet tasty treats in the winter.  Apple cake, apple fritters, apple bread, apple crisp, apple cobbler, apple dumplings…Any suggestions?

Popular apple sayings:

http://www.usapple.org/consumers/all-about-apples/history-and-folklore/popular-apple-sayings

As American as apple pie: Americans may profess to have invented this quintessentially American dessert, but history books trace pie as far back as 14th Century England. Pie-making skills, along with apple seeds, came over with the Pilgrims, and as the country prospered the rather slim apple pie of colonial times became the deep-dished extravaganza we enjoy today. Through the 19th and early 20th centuries, apple pie became the symbol of American prosperity, causing one American newspaper to proclaim in 1902,“No pie-eating people can be permanently vanquished.”

One bad apple spoils the whole bunch: First coined by Chaucer as, “The rotten apple injures its neighbors.”

Apple of my eye: This expression dates back to ancient Greece and Rome, when people conceived of the pupil of the eye to be, like the apple, a global object. The word itself comes from the Anglo-Saxon “aeppel”, which literally meant both “eye” and “apple.” In addition to providing the literal, vital sense of vision, the pupil was also regarded as the figurative “window” to the treasured secrets within each of us. Thus, the “Apple of my eye” meant someone very beloved.

An apple a day keeps the doctor away: Derived from the old English saying, “Ate an apple before going to bed, make the doctor beg his bread,” the original author of this most popular apple saying has been lost to history. Today, the expression rings truer than ever, as our knowledge of apples´ many and myriad health benefits increases.

Garden Apocalypse

Okay , well maybe it’s not exactly a garden apocalypse, but that’s what it always feels like when things are past thier prime and it’s time to start preparing for the fall and winter months ahead. Overall, I’m very pleased with the performance and production of most of what I planted this year! Here are a few happenings as of this afternoon:

The corn was a bit of an unexpected planting. My daughter snuck a few plants in amongst the tomatoes and peppers. I had told her that there would not be room to plant corn this year. She tried to tell me at one point that a bird must have pooped the seed out in the garden. My response was “Those are talented birds to poop the seeds in perfectly straight rows!” Haha!

I let her keep her beloved corn, and it made a tasty addition to dinner…and made her feel proud!

I can’t tell you how thrilled I am that those Japanese Beetles didn’t completely destroy the Abe Lincoln rose. It was severely damaged, but I found this bloom today!

The zucchini continues to produce, leaving me very thankful for such a wonderful harvest. I LOVE ZUKES!

The chrysanthemums are starting to bloom…a sure sign that summer is coming to an end.

Another sign of autumn is that the Sedum is beginning to bloom The butterflies really love this plant!

Acorn squash is growing steadily!

The Thornless Blackberry has sure filled out this area. I’m trying to get the vine to wind up this post. It’s not cooperating with me, but I will continue to argue with it until it does.

These annual Impatiens filled the area that I had intended for them nicely!

I forgot to take a photo of our carrot harvest. They were a small disappointment anyhow. I should have thinned them better. I was still able to blanch and freeze a gallon sized bag of them for soups and stews.

The tropical Peace lily also sustained damage from the beetles, but here it is blooming!

The tomatoes continue to produce faster than I can pick them. This is todays harvest. Some of the plants are close to seven feet tall when the vine is straightened out. We are still getting a few scattered green bell peppers.

While I have been busy putting up food for the winter, my husband has been busy getting firewood stacked and split. This is just the beginning. Our firewood pile will take up the entire back of our garage.

Thanks for sharing in our current garden pre-apocalypse!


Create it yourself craft supplies

sustainableecho.com

If you have a little time on your hands, you can save a lot of money making your own craft supplies! I have personally tried many of these and was very happy with the results.

Glue: http://craftingagreenworld.com/2011/01/31/five-recipes-for-natural-glue/

Clay: http://chemistry.about.com/od/chemistryactivities/a/modeling_clay_recipes.htm

Paper: http://www.planetpals.com/papermaking.html

Beads: http://familycrafts.about.com/od/makingbeads/Making_Your_Own_Beads.htm

Finger paint: http://tlc.howstuffworks.com/family/make-your-own-fingerpaint.htm

Watercolors: http://www.magicalchildhood.com/crafts/watercolors.htm

Yarn: http://www.squidoo.com/make_yarn

Spray paint: http://www.instructables.com/id/DIY-spray-paint/

Sidewalk chalk: http://www.instructables.com/id/Make-Your-Own-Sidewalk-Chalk/

Ink: http://www.make-stuff.com/formulas_&_remedies/miscellaneous_formulas/basic_ink.html

Glitter: http://www.planetpals.com/craft-non-toxic-craft-supply-recipes.html

Crayons: http://weefolkart.com/content/beeswax-crayons

Paint brushes: http://www.instructables.com/id/Making-your-own-paintbrushes/

Rubber stamps: http://www.apartmenttherapy.com/sweet-little-acorn-stamps-howt-131628

Polymer clay: http://thenewnew.blogspot.com/2011/06/homemade-polymer-clay.html

ploymer clay fairy

Made with polymer clay

Stencils: http://www.spraypaintstencils.com/make-a-stencil-tutorial.htm

Happy crafting!

Zucchini bliss!

I am so excited about the zucchini harvest this year! I have been quite busy finding ways to store this perfect veggie for winter. I’m also enjoying them fresh with nearly everything I eat.

Did you know that zucchini is a good source of Protein, Vitamin A, Thiamin, Niacin, Phosphorus and Copper, and a very good source of Dietary Fiber, Vitamin C, Vitamin K, Riboflavin, Vitamin B6, Folate, Magnesium, Potassium and Manganese? And it only contains 20 calories per 1 cup serving! 

Lots of people are giving them away this year because they did so remarkably well. I was greedy with mine, as I love them so much and can think of so much to do with them!

I’ve already made countless zucchini burgers and frozen them for winter eating. I also made the best zucchini bread known to man. I got the recipe from:

http://allrecipes.com/recipe/moms-zucchini-bread/detail.aspx?event8=1&prop24=SR_Title&e11=zucchini%20bread&e8=Quick%20Search&event10=1&e7=Home%20Page

I followed the recipe as written except I used slightly less sugar and substituted brown sugar for some of the white. Also, don’t drain the shredded zucchini because you will lose the moisture.

I also made a healthier version using apple sauce in place of most of the oil and whole wheat and rice flour. I used agave syrup and honey in place of the sugar. It came out just as good, although much denser of a loaf.

I’m looking forward to making a savory zucchini bread next time using garlic, onion, and rosemary.

The veggie burgers are the best that I have ever made. My husband told me not to share the recipe because he wanted to take a 2nd mortgage on our house to patent the recipe and sell these things! That’s quite a compliment coming from a die-hard meat eater!

Despite his enthusiasm, I can’t keep this recipe to myself!

Zucchini Burgers

3 cups chopped zukes

½ small onion

½ cup sun dried tomatoes

½ jalapeno

½ bell pepper

½ cup black olives

½ cup chick peas

3 eggs

1 cup oatmeal

¼ cup brown rice flour

2 cloves chopped garlic

Salt, pepper, cumin

Throw everything in the food processor and process until you have a slightly wet burger-dough. Pre-heat non-stick or cast iron skillet with a small amount of olive oil. Drop by heaping tablespoons onto hot pan and spread the burger out a bit with the back of the spoon. Cook about 2 minutes and flip. If the burger is too wet it will fall apart. Just add a bit more oatmeal and re-blend.

I can’t even begin to express how perfect and delicious these turned out! This will yield about nine bun-sized burgers.

Tonight I will be making and freezing large batches of zucchini rounds for frying. They are a perfect substitute for French fries. Just cut into strips or rounds, dip in egg whites and coat in corn-meal, flour, and seasonings. Freeze flat on a greased baking sheet or parchment until solid. Then just bag them up and fry as needed.

These will be perfect with all of the marinara sauce that I canned!

I never imagined I could get so excited over a vegetable. My life must be fairly mundane because I am the only one I know that thinks “Isn’t life grand?” when picking and cooking this baseball-bat sized vegetable!

The beauty of stained glass

A few months ago I found a really neat old stained glass window that a farmer was selling up the street from us. I thought it would make an excellent addition to our old brick house.

We had installed a fireplace and had to tile over the dated window, so from the outside of the window it looked terrible! (And useless.) This stained glass window would be a picture perfect solution!

This window was hand-made and is one of a kind.  The opening was not quite the same dimensions so my father had to frame in the new window over the old opening. He installed lighting behind the window; originally using solar power to light it. As it turned out, the product was defective and he ended up installing energy-saving LED’s on a timer. The result is stunning! It lights up at dusk every night and is no longer the eye sore it used to be! Being a masterful carpenter, he was able to make it look like it belonged there all along. It got me thinking about stained glass. Here are some things I discovered:

From: http://en.wikipedia.org/wiki/Stained_glass

As a material stained glass is glass that has been colored by adding metallic salts during its manufacture. The colored glass is crafted into stained glass windows in which small pieces of glass are arranged to form patterns or pictures, held together (traditionally) by strips of lead and supported by a rigid frame. Painted details and yellow stain are often used to enhance the design. The term stained glass is also applied to windows in which the colors have been painted onto the glass and then fused to the glass in a kiln.

Colored glass has been produced since ancient times. Both the Egyptians and the Romans excelled at the manufacture of small colored glass objects.

In Early Christian churches of the 4th and 5th centuries, there are many remaining windows which are filled with ornate patterns of thinly sliced alabaster set into wooden frames, giving a stained-glass like effect.

To make a mock stained glass window you can purchase self-adhesive vinyl, glass stain or paint pens and liquid lead. Just draw a pattern, decorate, and stick on an existing window.

My kids have made cute window hangings with colored tissue paper stuck on clear sheets.

thecraftycrow.net

You can also paint directly on plexiglass. Use a hot glue gun with black glue sticks to draw your design. Be sure to use glass paint (translucent) so that light will shine through!

instructables.com

Here are some gorgeous displays of stained glass: (The first is actually just made to look like stained glass, it’s actually sliced agate!)

worldsstrangest.com

allposters.com

timstanleyphotography.com

After this brief study on stained glass, I am itching to learn how to make one myself…or at least a faux version!

Canning tips

Canning used to scare me. I had thoughts of bacteria, germs, mold, and even botulism! I have since learned that there is nothing to fear as long as you are informed and prepared. Here are some simple and straight forward tips when canning your beautiful harvest of fresh fruits and veggies.

“In seed time learn, in harvest teach, in winter enjoy.”
William Blake

1. Only use a water bath canner for acidic foods such as tomatoes and fruit. Use a steam pressure canner for low acidic foods. Nearly all veggies have low acidity!

2. Make sure you have the proper tools such as the ones I have shown in the photo.

3. It is not a good idea to re-use canning lids. Reusing the jars and rings is fine as long as they are in great condition.

4. Always sterilize jars, rings, and caps in boiling water for 15 minutes before filling.

5. For extra acidity you can (and should) add a tablespoon or two of bottled lemon juice.

6. It is not recommended to can food with oil in it.

7. If you want to can tomatoes whole, simply drop them in boiling water for two minutes and then into an ice bath. The skins will come right off.

8. When pickling, make sure to allow your pickles to set for at least three weeks for best flavor.

9. Do not use thickeners such as corn starch or flour. Wait until you are ready to use to thicken.

10. Check jar seals after 24 hours. They should not press in or out.

11. Always use hot liquid in hot jars. It is safer and will reach proper canning temperatures faster.

12. Do not re-tighten the jar lids. (It may loosen the seal.)

13. If something does not seal properly, store in the refrigerator and use promptly.

14. Keep the lid on your canner to boil faster, and keep temperature better.

15. Leave head-space. I leave about a ½ inch from the top of the jar.

16. Release trapped air bubbles by running a non-metal spatula inside the jars.

17. Although there is a difference of opinion on this, jars should generally be used within a year.

18. Signs of spoilage include a swollen lid, leaky jar, or discoloration of the food. Never eat food from the jar with these signs.

19. A food processor makes life easier for canning sauces. I learned a hand-held also works well!

20. Green tomatoes and large zucchini make great pickles!

Happy canning!